Bulk Add Waypoints
This feature lets you add multiple waypoints to a trip all at once. The text input field expects one waypoint per line. If you just enter a geocaching.com GC code, one per line, the cache with that code will be added to your trip. If you want to supply corrected coordinates, the input lines must look as follows:
GCcode;Corrected Coordinates;comment
Note that GCcode is mandatory and it would be pointless to leave out Corrected Coordinates since that is the purpose of this format. If you have nothing to say in the comment field, be sure to supply the semi-colon anyway or you will get an error.
Another form is for cases where you have coordinates for a waypoint but it is not a geocache on geocaching.com. The general format is:
Waypoint name;waypoint type;Coordinates;comment
Waypoint type is a mandatory field and all fields must have a semi-colon even if the content is empty.
Available waypoint types:
- parking Parking
- point Meeting point
- lodging Lodging
- food Food/rest
- attraction Tourist attraction
- supplies Store/Supplies/service
- station Station/stop/terminal
- benchmark Benchmark
- waymark Waymark
- lab Lab cache
- gas Gas station
- charging Charging station
- other General waypoint
Why would this be interesting? Consider the case of the 2019 Yuma Mega event where they supplied everyone with a list of coordinates for the Discover Yuma activity. Each location had a cache container but most were never going to be published. Here is an example of the input (this is only 5 of the total 20 they gave out)
N 32 41.058 W 114 27.912
N 32 42.800 W 114 42.632
N 32 29.747 W 114 45.250
N 32 43.951 W 114 38.750
N 32 38.460 W 114 33.524
Before the bulk add waypoints feature, your best option was to enter all 20 manually one at a time. Now let’s look at how you can enter them all, optimize your route and be on the road before others have barely begun entering them.
The input we want for the Bulk Add tool will look like:
YUMA1;other;N 32 41.058 W 114 27.912;
YUMA2;other;N 32 42.800 W 114 42.632;.
…
We have chosen to name each of the waypoints YUMAn for reference purposes.
If you have a laptop with a capable text editor, you can massage the list of coordinates given out to this format but for this example, we will assume nothing more than some sort of mobile device (including a laptop) and a data connection. We will use an online simple text manipulation tool: https://nimbletext.com/howto/ManipulateText
We want to prefix each line with YUMAn;other; and suffix each line with a semi-colon. Therefore the Add prefix and suffix to all lines is perfect. After the coordinate list is pasted in:
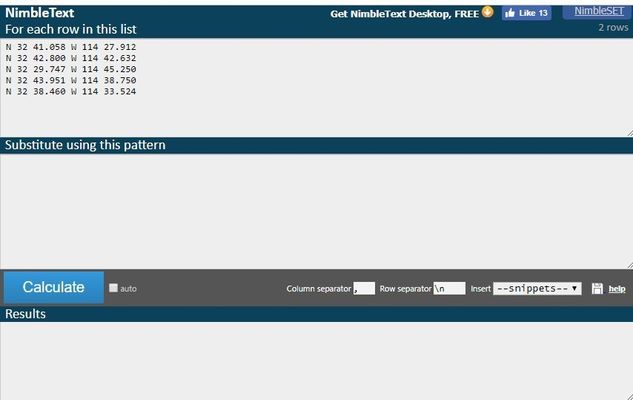
A substition pattern to change the lines is very simple: YUMA$rownumOne;other;$row;
This says: for each line, prefix “YUMAn;other” where n numbers from 1 followed by the value of the current row followed by a semicolon.
The output is::
YUMA1;other;N 32 41.058 W 114 27.912;"comment"
YUMA2;other;N 32 42.800 W 114 42.632;"comment"
YUMA3;other;N 32 29.747 W 114 45.250;"comment"
YUMA4;other;N 32 43.951 W 114 38.750;"comment"
YUMA5;other;N 32 38.460 W 114 33.524;"comment"
The comment part isn't needed, so without comments after the coordinates field, we need to end the output with a semicolon, and if we end the lines with comments, we don't use a semicolon at the end
Copy and paste this into the Bulk Add Waypoints input field and click Add.

The trip now looks like this:

Next run the Edit->Sort/Prioritize Waypoints command, select all waypoints with a Toggle Marked and click Calculate and Sort by Optimal Route. Then Save the optimized route. Finally, Edit->Order New Route Calculation. You get this result:
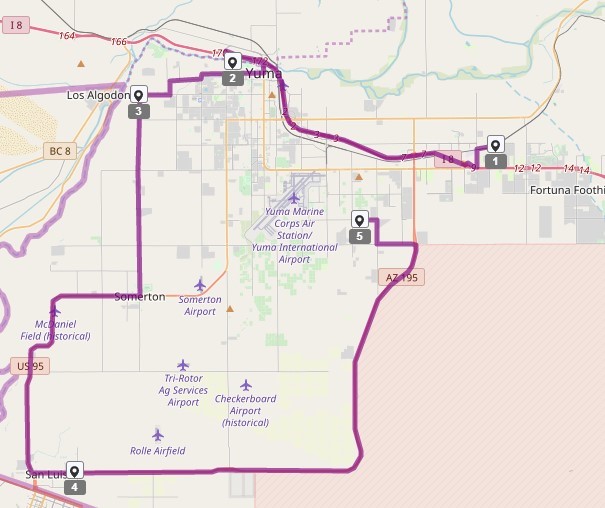
In reality, you would want your current location to be the first entry in the trip so that the route starts where you are located but this is just an example. Imagine how handy this would be with 20 locations all over town to visit.
Now let’s execute the trip. Using the Cachetur companion app, just download the new trip and you get:
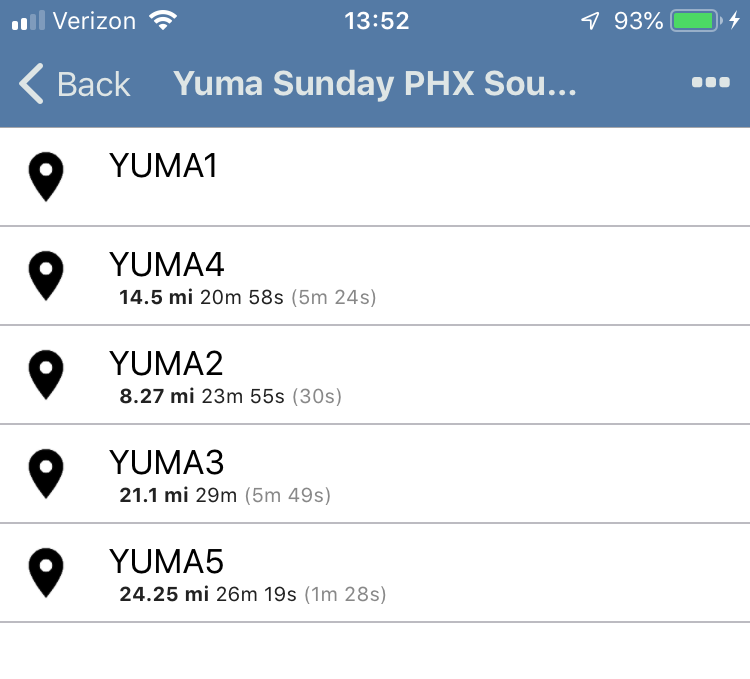
All you do then is go in this order to do the route optimally. If you have companions who need a GPX of the route, that can easily be generated and downloaded from cachetur.no.